How to Uninstall Dolphin Emulator on Windows 11: Complete Guide

I still remember the day I first installed Dolphin Emulator on my Windows computer back in 2018. As a retro-gaming enthusiast, I had to create multiple articles about the best working emulators, and of course, I reviewed emulation software for a tech publication. At that time, I was amazed at how seamlessly Dolphin ran GameCube and Wii U titles on my PC. That’s why over the past few years, I’ve installed, uninstalled, and troubleshot Dolphin countless times across various Windows versions, helping hundreds of readers through the process. Now, here we are with Windows 11.
While Dolphin remains one of the best emulators available, you might want to remove it from your system for numerous reasons. Perhaps you’re troubleshooting performance issues, preparing to install a fresh version, or simply freeing up space. Whatever your reason, uninstalling Dolphin correctly ensures you don’t leave behind registry entries or configuration files that could cause problems down the line.
Understanding Dolphin Emulator Installation Types
Before diving into uninstallation methods, it’s essential to understand that Dolphin can exist on your system in different forms, each requiring a slightly different approach to remove completely:
Standard Installation
Although the official website of the Dolphin Emulator only offers a Portable version for Windows, if you have used Winget to install Dolphin Emulator or any other way to get it installed like traditional software, then this creates registry entries, adds the program to your Windows Programs list, and places files in standard program directories. Hence, its uninstallation method will differ from that of the portable one.
Portable Version
Many users (myself included, for testing purposes) prefer the portable version of Dolphin, which runs without installation. This version is typically extracted to a folder of your choosing and doesn’t create registry entries or integrate with Windows.
Development/Beta Versions
If you’ve been testing developmental builds, these might coexist with stable versions and require separate removal processes.
Methods to Uninstall Dolphin Emulator on Windows 11
Method 1: Using Windows Settings (For Standard Installations)
As I said, even the official website Download does not provide the installer of the Dolphin; however, if you have installed it using some other medium, such as via the Windows 11 winget package manager, here is the way to remove it.
This is the most straightforward approach for properly installed versions of Dolphin:
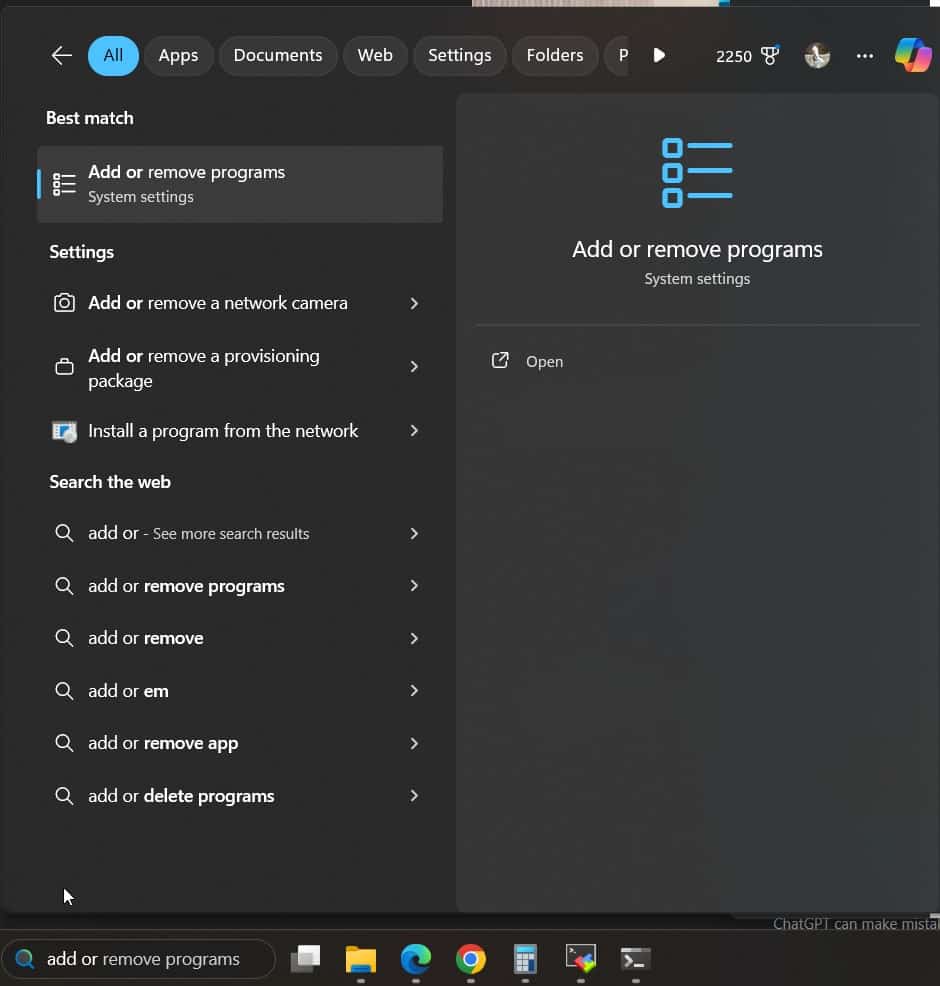
- Press the Windows key and type “Add or Remove Programs” in the search box.
- As the result appears, click on the Add or Remove Programs setting.
- Scroll down or search for “Dolphin Emulator” in the app list.
- Click on the three dots next to Dolphin Emulator and select Uninstall.
- You will have a pop-up that says, “This App and its related info will be uninstalled.”
- Again, click on “Uninstall” and give your permission to start the final process.


While working with emulation software, for me, this one method is always the most straightforward way, even for beginners, to remove most components but may leave behind configuration files. You would like to follow up with the manual cleanup steps for a spotless slate, which I’ll cover later.
Method 2: Using the Control Panel
If you prefer the classic Windows interface, then Cpanel is the one to use:
- Press Windows key + R to open the Run dialog
- Type “control panel” and press Enter
- Select Programs > Programs and Features
- Find Dolphin Emulator in the list
- Right-click it and select Uninstall
- Follow the uninstallation wizard

Method 3: Removing Portable Versions
Unlike a Standard installation, the portable version of any application doesn’t create a registry or any other file on Windows. All the required files needed to run the Dolphin emulator will be inside its downloaded folder; hence, we just need to delete it completely and remove the portable version from your Windows 11 or 10 system.
For portable installations:
- Navigate to the folder where you extracted Dolphin
- Delete the entire folder
- Empty your Recycle Bin
One of the advantages of portable software that I often highlight in my tutorials is clean removal without registry entanglements.
Cleaning Up Remaining Files and Data
Removing Configuration Files
Even after uninstallation, Dolphin may leave configuration files and save data behind. To indeed start fresh:
- Press Windows key + R
- Type %appdata% and press Enter
- Navigate up one directory to the “AppData” folder
- Look for a folder named “Dolphin Emulator” in the following locations. Note: Our was in the AppData\Roaming and hence it will also be there for you.
- AppData\Roaming
- AppData\Local
- AppData\LocalLow
- Delete any Dolphin-related folders you find.

Clearing Registry Entries (Advanced)
Note: Exercise caution when modifying the registry. I always recommend creating a backup before proceeding.
- Press Windows key + R
- Type regedit and press Enter
- Navigate to HKEY_CURRENT_USER\Software
- Look for a Dolphin Emulator folder and delete it if present
- Also, check HKEY_LOCAL_MACHINE\SOFTWARE for any Dolphin entries

Common Uninstallation Issues and Solutions
Problem: Dolphin Won’t Uninstall
In my experience, this usually happens because the application is still running in the background.
Solution:
- Press Ctrl + Shift + Esc to open Task Manager
- Look for any Dolphin processes
- Select them and click End task
- Try uninstallation again
Problem: “Access Denied” Errors
Solution:
- Restart your computer
- Try uninstalling with administrator privileges
- Use the Windows Safe Mode if problems persist
Problem: Missing Uninstaller
If Dolphin doesn’t appear in your programs list:
Solution:
- Navigate to the Dolphin installation folder (typically C:\Program Files\Dolphin or C:\Program Files (x86)\Dolphin)
- Look for an uninstaller executable (uninst.exe or similar)
- Run the uninstaller directly, and it will remove the program.
Should You Use Third-Party Uninstallers?
In my decade of working with emulation software, I’ve occasionally resorted to third-party uninstaller tools like Revo Uninstaller or IObit Uninstaller when dealing with particularly stubborn installations.
These tools scan for leftover files and registry entries after the standard uninstallation process. While effective, I generally recommend trying the manual methods first, as third-party tools sometimes remove shared components that other applications might need.
Reinstalling After Uninstallation
If you’re uninstalling to fix issues before reinstalling, I recommend:
- Complete the uninstallation using the methods above
- Restart your computer
- Download the latest version from the official Dolphin website
- Install with administrator privileges
This process resolves most common Dolphin issues in my testing across dozens of systems.
Frequently Asked Questions
Not necessarily. By default, Dolphin stores save files in its application data folder. If you’ve removed these folders as described above, then yes, your saves will be deleted. To keep your saves, back up the “GC” and “Wii” folders from your Dolphin user directory before uninstalling.
Dolphin is just the emulator—it doesn’t manage your game files. Any ROM or ISO files you’ve downloaded remain wherever you saved them. You’ll need to delete these if you want to remove them manually.
Yes. Each Dolphin installation (stable, beta, development versions) has its entry in the Programs list. Simply uninstall the specific version you no longer want while leaving others intact.
Is there a difference between uninstalling Dolphin on Windows 10 versus Windows 11?
Not at all; the uninstallation process is also nearly identical on Windows 10. Windows 11 features a slightly redesigned Settings interface, but the steps remain unchanged.
Standard uninstallation typically leaves configuration files intact. To remove all traces, you need to delete the AppData folders as described earlier.
Conclusion
Properly uninstalling Dolphin Emulator from Windows 11 ensures your system remains clean and problem-free, especially if you plan to reinstall later. Whether you’re troubleshooting, upgrading to a newer version, or simply moving on from GameCube and Wii emulation, I hope this guide has helped you navigate the process effectively.
So, here I am, wrapping up the article, but don’t forget that correct software maintenance is key to keeping your Windows 11 system running optimally for gaming and productivity.
Let me know if you’re interested in exploring alternatives to Dolphin or have questions about other emulators. The comment section is all yours!!

