
As someone who writes technical tutorials, I have seen many users facing problems in segregating files in Windows 11 or 10 File Explorer. However, when we open a folder, we will have options to view the files and folders present inside as per date, size, or with any other attributes present in Windows if we have used the “Detailed” view. However, how do we configure them to use every time we open File Explorer in any folder but permanently?
We spent about an hour trying the best possible method for solving this problem for Windows users, and here we are with two easy methods that even a beginner can follow.
Understanding Windows 11 Explorer View Settings
First, understand how Windows 11 handles folder views and why your carefully selected column headings keep disappearing.
Windows 11 introduced a streamlined File Explorer with a command bar that replaced the traditional ribbon interface from Windows 10. While aesthetically pleasing, this new design changed how folder view preferences are stored and applied across the system.
By default, Windows applies view settings based on folder types (like Documents, Pictures, or Music). When you change column headings in one folder, Windows doesn’t automatically apply those changes to all folders of the same type—let alone across your entire system.
Key Concepts to Understand
- Folder Templates: Windows assigns specific templates to folders based on their perceived content (Documents, Pictures, Music, etc).
- View Settings: These include details like icon size, column headings, sorting order, and grouping
- View State Cache: Windows stores your folder customizations in a hidden database, but it doesn’t always permanently respect these settings.
As of early 2025, Windows 11 continues to receive updates that affect File Explorer functionality. The 24H2 update introduced several improvements to File Explorer’s performance and customization options, but the issue of persistent column headings still frustrates many users.
Microsoft has acknowledged user feedback about view persistence issues, and while they’ve made incremental improvements, a complete solution requires understanding several interconnected settings.
One recent change is the enhanced “View” options in File Explorer’s command bar. These options now include more granular control over saving and applying your view preferences. However, these options alone aren’t enough to make your heading selections permanent for every folder; users must manually configure and apply the changes.
Step-by-Step Guide to Making File Explorer Headings Permanent in Windows 11 or 10
After trying multiple methods of troubleshooting this issue for myself and readers, I’ve found foolproof methods that work consistently across Windows 11 systems. Follow these steps carefully:
Method 1: Apply to All Folders (The Quick Solution)
- Open File Explorer by pressing Win+E. Then click “View” and select the Details option.
- Navigate to any folder where you want to customize column headings, such as Downloads, Documents, Pictures, etc.
- Right-click on any column header and select which columns you want to display or hide, such as Date of Creation, Modifying, Owner, File Size, etc. As you choose a column, it will immediately display in the File explorer.
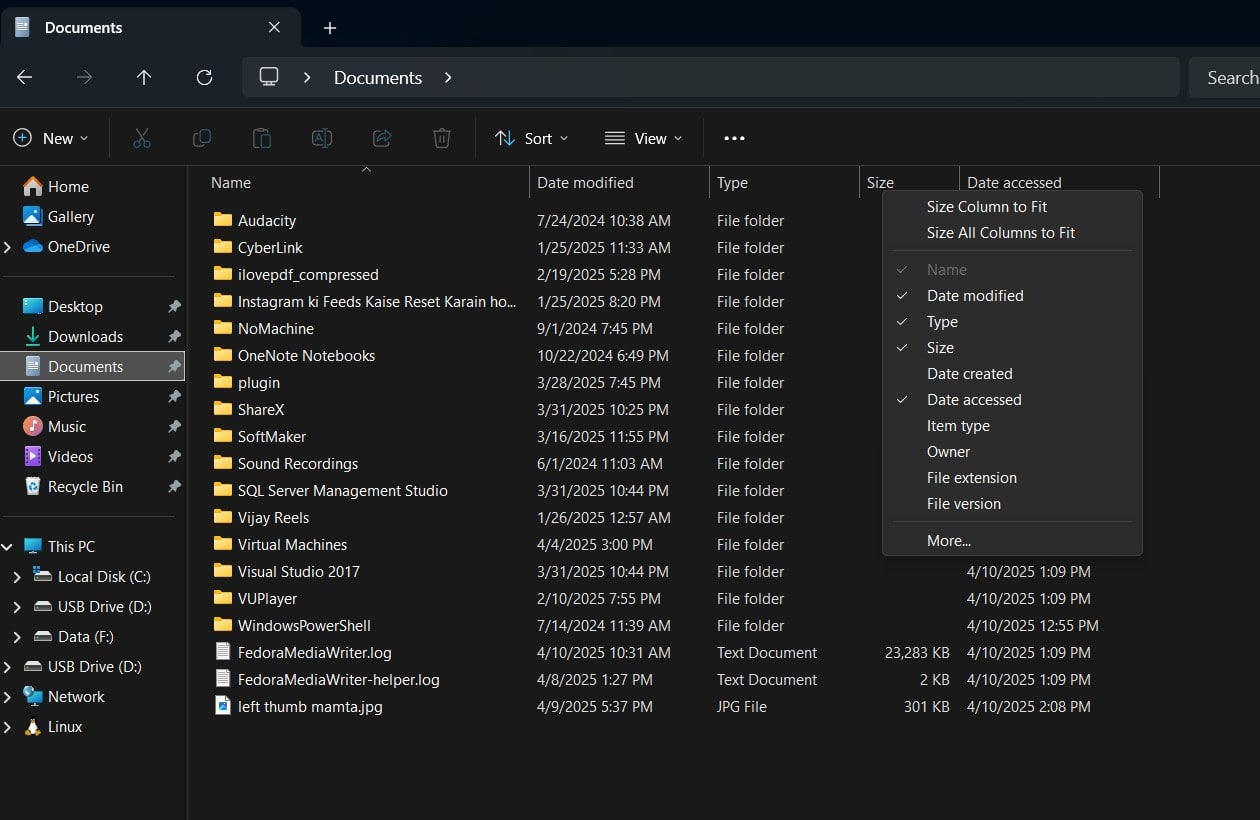
- Once you have selected the column headers that need to be displayed, we can further arrange them in our preferred order by dragging them.

- Now, to apply the changes you have made to all folders present inside that particular folder where you have changed the headers, click on the three dots given right to the “View” option and from the drop-down menu select “Options” given at the bottom.

- In the Folder Options dialog, click the “View” tab
- Click the “Apply to Folders” button
- When prompted with “Do you want all folders of this type to match this folder’s view settings?” click “Yes“
- Click “OK” to save your changes.

This method works for basic scenarios but may not persist through Windows updates or system changes. For a more permanent solution, try the following:
This solution has been my go-to recommendation for readers with complex file organization needs. The reset made by the WinSetView application will also clear any corrupted view settings, while the PersistBrowsers registry modification forces Windows 11 to save and maintain your preferences.
WinSetView is open-source software available on GitHub and can be installed using the Windows Winget Package Manager. It is available in both portable and standard installer formats. You can manually download any of them from the given Github link.
Those who want to use the Winget command to install it can simply follow the given steps.
- Right-click the Windows 11 Start menu and select Terminal (Admin) or Windows PowerShell (Admin), whichever is available.
- After that, run the given command:
winget install winsetviewOnce installed, follow the further steps to change all the Folder headings on Windows 11 or 10 with just one click.
- Open WinsetView after installing it or from the portable folder if you are using it.
- After that, click on the Columns button.

- Select the Header Columns you want to add to your File Explorer for all folders, such as Date, size, Type, Owner, File extension, etc. After selecting them, click the return arrow button.

- Click the “Submit” button to apply the changes you have made to the Windows 11 to 10 File Explorer headers.

- Click the OK button to allow the WinsetView to “Clear folder Views and Set new defaults” and “Reset Explorer Options” in your Windows 11 or 10.

- Finally, you will see the PowerShell windows showing the operations being performed. Soon, the command window will close automatically once the process is done. It will also stop and start your File explorer to apply the changes.

- Now, open any folder in File Explorer. Of course, the View must be set to “Details.” You will see the added or removed header selections in your Windows 11 or 10 folders.

Common Questions About Windows 11 Explorer Headings
A: This happens because Windows maintains separate view settings for different folder types. The registry modification in Method 2 forces Windows to respect your preferences across all folder types.
A: Absolutely! Windows 11 allows you to customize views per folder type. The trick is to:
1. Customize one folder of each type (e.g., Documents, Pictures)
2. Click View > Options > View tab
3. Click “Apply to Folders”
Repeat for each folder type.
I use this approach to have my Document folders show columns for Date Modified and Size, while my Picture folders show Dimensions and the Date Taken.
A: Yes, but with limitations. Column width adjustments are stored in the same view settings database but are more prone to resetting. The registry modifications in Method 2 help maintain these settings more reliably.
A: Major Windows updates can occasionally reset view preferences. I recommend documenting your preferred setup and reapplying the registry modifications after significant updates. In my experience, the 24H2 update was particularly aggressive about resetting these settings.
A: Yes, several utilities can help. One we have already shown is WinSetView; however, to get a third-party file explorer, you can go for Explorer++ or Files App (available in the Microsoft Store), as they offer more consistent view management than the built-in Explorer. However, the methods I’ve outlined for most users provide a native solution without additional software.
Expert Recommendations
After going through Windows Explorer and viewing settings across multiple versions, I’ve developed some best practices that I share with all my readers:
- Create a View Settings Backup: After getting your perfect setup, export the relevant registry keys:
- Open Registry Editor
- Navigate to
HKEY_CURRENT_USER\Software\Microsoft\Windows\CurrentVersion\Explorer - Right-click on the Explorer key and select Export
- Save the file somewhere safe
- Use Keyboard Shortcuts for Efficiency: Windows 11 includes several valuable shortcuts for managing Explorer views:
- Ctrl+Shift+6: Details view (shows columns)
- Alt+P: Show/hide preview pane
- Alt+V: Opens the View menu
- These shortcuts save me countless clicks when managing files across multiple folders.
- Consider Your Workflow: Different projects require different column setups. I maintain three different view configurations:
- For writing projects: Name, Date Modified, Tags
- For photo organization: Name, Date Taken, Dimensions, Size
- For software development: Name, Type, Date Modified, Size
Apply the appropriate view based on your current project rather than using a one-size-fits-all approach.
- Group and Sort Strategically: Beyond heading selection, use Windows 11’s grouping and sorting features to enhance organization. For instance, when managing project files, I group them by Date Modified and sort them by Name within those groups.
Conclusion: Mastering Your Windows 11 Explorer Experience
Making heading selections permanent in Windows 11 Explorer isn’t just about fixing an annoying issue—it’s about taking control of your digital workspace. The methods I’ve shared come from hands-on experience managing complex file systems for personal and professional use.
Remember that the perfect file organization system works for your specific needs. Experiment with different column combinations, grouping methods, and sorting options until you find your ideal setup.
Have you found other effective methods for managing Explorer views in Windows 11? I’d love to hear about your experiences in the comments below. If you find this guide helpful, consider sharing it with other Windows users who are facing similar frustrations.


